Friday, August 31, 2018

Oracle RAC ASM diskgroup rename

Rename ASM diskgroup 

First, check there should not be any running transactions going on the diskgroup you are going to rename.

Dismount the DISKGROUP to be renamed on all the nodes

Run renamedg check for checking, it will let you know if any other steps needed before actual rename of diskgroup like dismount of diskgroup on another node
renamedg dgname=<old_dgname> newdgname=<new_dgname> verbose=true check=true
Now run the renamedg for renaming the diskgroup
renamedg dgname=<old_dgname> newdgname=<new_dgname> verbose=true

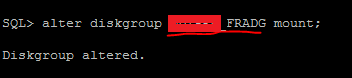
Mount the newly named DISKGROUP


Monday, August 6, 2018

Oracle RAC Clusterware 11gR2 startup sequence with explained diagram

When a RAC node of Cluster starts or restarts, first daemon to be started is OHASD by server specific cluster initialization procss.

OHASD has access to OLR i.e Oracle Local Registry stored on local system, which is just copy of OCR i.e. Oracle Clusterware Registry.

OLR contains the information required to complete the OHASD initialization.

OHASD brings up GPNP and CSSD as CSSD has access to GPNP Profile which contains below data required to start ASM instance

i.   ASM Diskgroup discovery string
ii.  ASM spfile location
iii. ASM all diskgroup details with the one, which is containing Voting Files


RAC Clusterware Startup Sequence


Once Voting Files are located and accessed by CSSD, CSSD is able to complete its initialization and join the existing cluster.

OHASD starts ASM instance which then starts operating with CSSD.

Once ASM instance started with its diskgroup mounted, OCR available on ASM diskgroup will be accessible to CRSD.

Clusterware completes its initialization and brings up other remaining daemons / services

Briefing about the files involved in the Clusterware startup

a) OLR - Oracle Local Registry, as the name suggests it is stored locally and kind of registry for RAC, 
which contains information regarding the location of voting disk and the information related to ASM instance startup as discussed above

b) Voting Disk - Contains the hearbeat of complete Clusterware, meaning it manages information about node membership.
It prevents Split-Brain scenarios

c) OCR - Oracle Clusterware Registry is the file which manages Cluster Configuration information

Thursday, July 26, 2018

Script to monitor Oracle ASM diskgroup

Script to monitor Oracle ASM diskgroup and drop mail if threshold crossed

--------------------------------------------
/u00/oracle/SCRIPTS/asm/asm_diskgroup.sh
--------------------------------------------
set -x
export ORACLE_SID=<<DB_SID>>
export ORACLE_BASE=/u00/oracle
export ORACLE_HOME=/u00/oracle/product/10205
export PATH=$ORACLE_HOME/bin:$PATH
export LD_LIBRARY_PATH=$ORACLE_HOME/lib:$LD_LIBRARY_PATH

${ORACLE_HOME}/bin/sqlplus  "sys/India123@ASM_Testing.india as sysdba" << EOF

@/u00/oracle/SCRIPTS/asm/asm_diskgroup_status_Testing.sql
EOF

cat /u00/oracle/SCRIPTS/asm/asm_diskgroup_status_Testing.html > /u00/oracle/SCRIPTS/asm/asm_status_final.html


t1=7

t2=`grep "no rows selected" /u00/oracle/SCRIPTS/asm/asm_status_final.html|wc -l`
echo $t1
echo $t2
if [ "$t1" == "$t2" ]
then
echo "no mail"
else
export MAILTO="er.vaibhav1425@gmail.com"
export SUBJECT="ASM DISKGROUP STATUS REPORT(>85%)- "
TIME=$(date +"%d-%m-%Y")
export CONTENT="/u00/oracle/SCRIPTS/asm/asm_status_final.html"
(
echo "To: $MAILTO"
echo "Subject: $SUBJECT $TIME"
echo "MIME-Version: 1.0"
echo 'Content-Type: multipart/mixed; boundary="-q1w2e3r4t5"'
echo
echo '---q1w2e3r4t5'
echo "Content-Type: text/html"
echo "Content-Disposition: inline"
cat $CONTENT
echo '---q1w2e3r4t5'
) | /usr/sbin/sendmail -r Oracle_asm@testing.com $MAILTO
fi
set +x
--------------------------------------------
<<END>>
--------------------------------------------
/u00/oracle/SCRIPTS/asm/asm_diskgroup_status_Testing.sql
--------------------------------------------

SPOOL /u00/oracle/.JLR_SCRIPTS/asm/asm_diskgroup_status_Testing.html

COLUMN spool_time NEW_VALUE _spool_time NOPRINT
 SELECT TO_CHAR (SYSDATE, 'DD Mon YYYY') spool_time
  FROM DUAL;


CLEAR COLUMNS BREAKS COMPUTES

SET markup html on -
table  'WIDTH="95%" align="center" BORDER="1"'

SET feedback off
COLUMN dbname                 FORMAT a25           HEADING 'DATABASE NAME' ENTMAP off
COLUMN group_name             FORMAT a25           HEADING 'DISK GROUP NAME' ENTMAP off
COLUMN state                  FORMAT a11           HEADING 'STATUS'  ENTMAP off
COLUMN total_mb               FORMAT 999,999,999   HEADING 'TOTAL SIZE (GB)' ENTMAP off
COLUMN used_mb                FORMAT 999,999,999   HEADING 'USED SIZE (GB)' ENTMAP off
COLUMN pct_used               FORMAT 999.99        HEADING 'PERCENTAGE USED' ENTMAP off
set lines 300
set pages 300
SET feedback      ON

prompt DB_NAME - QA(<<Server_details>>) ASM DISKGROUP Status 
--<--- Your wish in prompt

SELECT
    c.db_name                                   dbname
  ,  dg.name                                     group_name
  , dg.state                                    state
  , dg.total_mb/1024                                 total_gb
  , (dg.total_mb - dg.free_mb)/1024                     used_gb
  , ROUND((1- (dg.free_mb / dg.total_mb))*100, 2)  pct_used
FROM
    v$asm_diskgroup dg,v$asm_client c
WHERE
     dg.group_number =
 c.group_number and dg.total_mb != 0 and ROUND((1- (free_mb / total_mb))*100, 2) >=85 and dg.name not like '%REDO%' and c.db_name not like '%ASM%' and c.db_name not like '%mgmtdb%' ORDER BY  pct_used desc;

SET feedback      ON
SET heading       ON
SET verify        ON
SET wrap          OFF
SET trimspool     OFF
SET serveroutput  OFF
SET escape        OFF
SET MARKUP HTML OFF
SET TERMOUT ON

Spool off;

Tuesday, July 17, 2018

Oracle XAG Installation

XAG Installation
=================
This must be run on both nodes.
Create /u00/oracle/grid/product/xag directory on all servers in the cluster with owner oragrid:oinstall and permissions 750.
Copy the zip file to /u00/oracle/grid/xag/product/xag and unzip it. <-- can be downloaded from link in Notes
Create directory /u00/oracle/grid/product/xag/XAG_7
Run the install script:
cd /u00/oracle/grid/product/xag/xag
./xagsetup.sh --install --directory /u00/oracle/grid/product/xag/XAG_7
Modify permissions of ACFS resource to allow the GG Account to mount and unmount it.
<GRID_HOME>/bin/srvctl modify filesystem -d /dev/asm/<file system name> -u <os_user_name>

be in oragrid or ASM owner user


cd /u00/oracle/grid/product/xag/xag

./xagsetup.sh --install --directory /u00/oracle/grid/product/xag/XAG_7

<GRID_HOME>/bin/srvctl modify filesystem -d /dev/asm/testing5d1ggs-119 -u testing5d1g


Notes : 

Link from where you can download xag gzip file
http://www.oracle.com/technetwork/database/database-technologies/clusterware/downloads/xag-agents-downloads-3636484.html
You can use directory structure as per your requirement
os_user_name must be the user which you want to be owner of GG filesystem

Install OEM 13c or any OEM agent version using AgentPull Method

AgentPull Method to install any version oem agent on db server

curl "https://oem13c.local.net:7802/em/install/getAgentImage" --insecure -o AgentPull.sh


chmod +x AgentPull.sh


/home/oracle/AgentPull.sh.template

Note : Update the sh file before running it as suggested

./AgentPull.sh LOGIN_USER=sysman LOGIN_PASSWORD=welcome123 PLATFORM="Linux x86-64" AGENT_REGISTRATION_PASSWORD=welcome123 AGENT_BASE_DIR=/u00/app/oracle/agent13c

Notes :

======
https link <-- this will be your oem url
AgentPull.sh.template <-- make sure to update the oms server and port
AGENT_BASE_DIR <-- Make sure to change this to ur server directory location where u want to install agent
Run root.sh once agent is installed successfully, just after agent installation